“U-Design” Premium WordPress Theme Documentation for version 3.4.16
Created By: Andon
Email: ThemeForest profile page
Thank you for choosing the "U-Design" theme. If you have any support related questions, please feel free to post them to the theme's support forum. You can subscribe to the Support Forum HERE.
For more information please refer to the license included with the theme or Licensing Terms on the ThemeForest site.
Table of Contents
- Installing the Theme (Theme Update Instructions)
- Related Plugins (Plugins Update Instructions)
- Front Page
- Front Page Sliders
- Import Demo Content
- General Options
- Portfolio Section
- Blog/News Section
- Contact Page
- Icon Fonts
- CSS Files and Structure
- Additional Information
- PSD Files
- Font Settings & Custom Colors
- List of All Custom Fields Available with the Theme
- Responsive Layout
- WooCommerce Integration with U-Design
- Sources and Credits
A) Installation - top
1-Click Install:
The 1-click install method works with the help of the Envato Market plugin. Installation instructions and the latest version of the Envato Market plugin ZIP file can be downloaded from https://envato.com/market-plugin/.
Manual Install:
IMPORTANT: Make sure you unzip the downloaded file from ThemeForest first (do not try to install or upload this file to your server). In the contents of this file you will find the actual theme zip file called "u-design.zip". This is the file you're going to be using to install the theme in your WordPress.
Now, to install the theme choose one of the two methods:
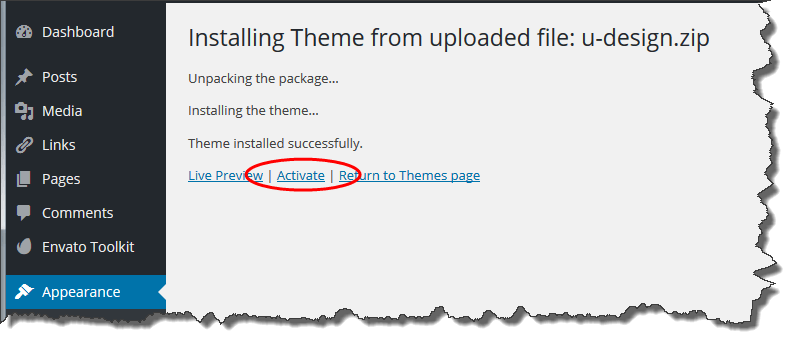
- Method 1 - Upload the u-design.zip file through the WordPress admin backend (This will ONLY work if the server that hosts your website allows upload limits greater than 14 MB. Please note that some hosting providers have that upload limit set by default to only 2 MB):
Then, click the "Upload Theme" button located at the very top of the page: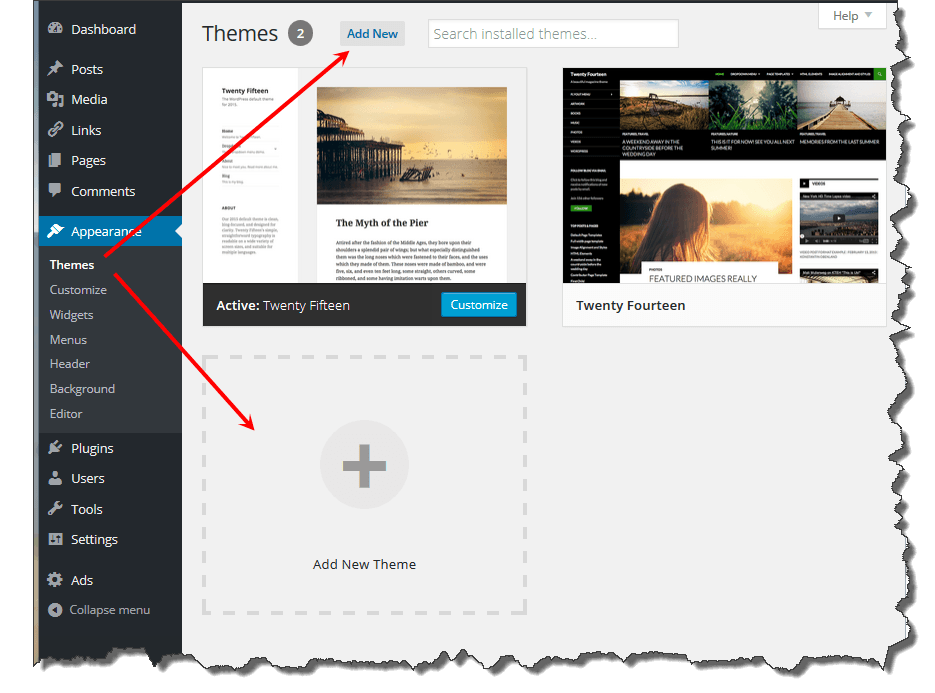
Then, choose the u-design.zip and click "Install Now":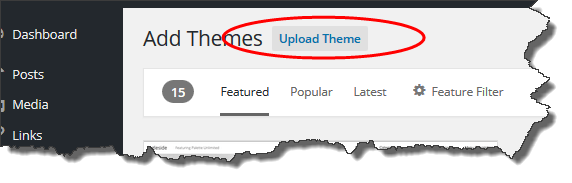
Then, when prompted activate the theme: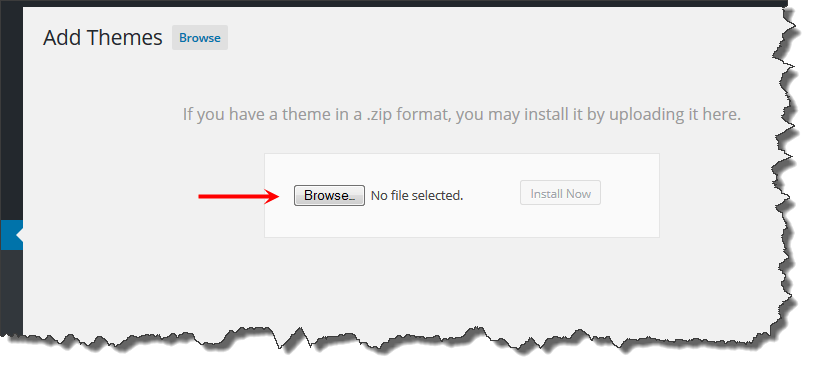
Note: If you can't get passed the file upload limit and/or if you get an error message mentioning exhausted memory size or something in those lines, you could try to increase that limit by adding to the "wp-config.php" the following line of code:
define('WP_MEMORY_LIMIT', '64M');If that doesn't make any difference, contact technical support at your hosting provider and they should be able to assist you with increasing the file upload memory limit.
- Method 2 (FTP) - Unzip the u-design.zip and upload the extracted u-design/ folder to <wordpress install directory>/wp-content/themes/ with your favorite FTP client so that the structure looks like:/wp-content/themes/u-design/.
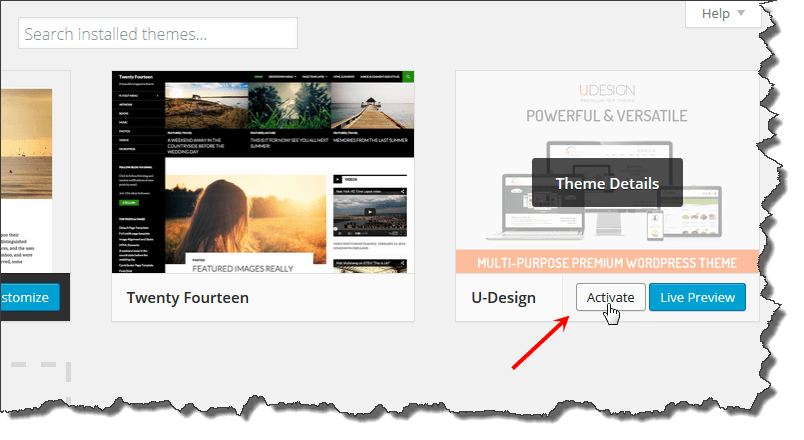
Once the upload is complete go to the WordPress administrator backend and activate the theme (the theme should appear now under Appearance --> Themes)
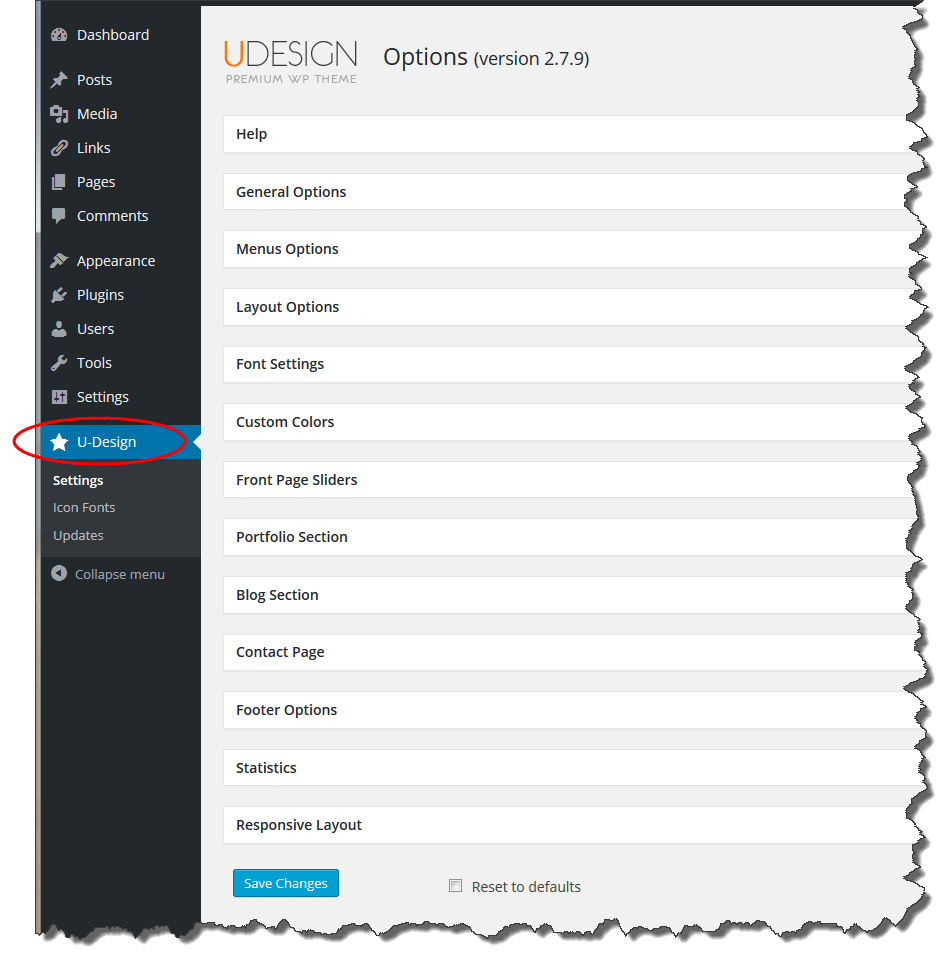
The theme's options page should appear now near the bottom of the sidebar under the name "U-Design":
IMPORTANT: Once you've installed the theme successfully you will need to install some plugins (please refer to the next section: Related Plugins) necessary to get the most functionality for the theme.
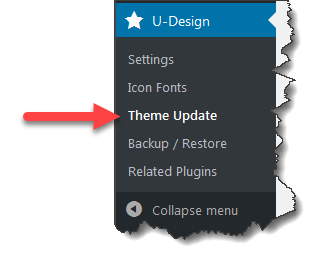
Theme Update Instructions:
For theme update options and instructions please refer to the 'Theme Update' page:
B) Related Plugins - top
Required Plugins:
- U-Design Core - This is an accompanying plugin for the U-Design theme. This plugin contains functionality to serve the U-Design theme that do not otherwise belong in a theme according to Envato's theme and plugin requirements. Those are things like widgets, shortcodes, woocommerce compatibility, etc.
- WP-PageNavi - This plugin provides the pagination for the Blog section (pages).
- Envato Market - The Envato Market plugin can install WordPress themes and plugins purchased from ThemeForest & CodeCanyon by connecting with the Envato Market API using a secure OAuth personal token. Once your themes & plugins are installed WordPress will periodically check for updates, so keeping your items up to date is as simple as a few clicks.
- CMB2 - CMB2 is a developer's toolkit for building metaboxes, custom fields, and forms for WordPress. It is required for the theme's "U-Design Options" metabox located under a page or post editor. If you have this plugin disabled or uninstalled then you simply won't have access to the "U-Design Options" metabox.
Recommended/Optional Plugins:
- Elementor Page Builder - Elementor is the World's Leading WordPress Page Builder. It was built for designers, developers, marketers, and entrepreneurs. Create stunning landing pages, design a blog, customize your online store – everything is within reach! Enjoy Over 80 Design Elements. Take advantage of the complete set of dedicated tools that help you generate more traffic, leads, and conversions.
- WPBakery Page Builder for WordPress (formerly Visual Composer) - The WPBakery Page Builder plugin offered by the "U-Design" theme is a Drag-and-Drop Frontend and Backend Page Builder Plugin for WordPress that will save you tons of time working on the site content. You will be able to take full control over your WordPress site, build any layout you can imagine – no programming knowledge required. Moreover, now you can choose either work on a backend or move your page building process to frontend and instantly see changes you make. Once you install and activate the plugin you may access its settings page in Settings → WPBakery Page Builder and by default when you go to edit a page you'll now see the WPBakery Page Builder buttons immediately above the page editor. More about this plugin could be found HERE and available Documentation. For support, please post your questions at the theme's Support Forum. You should be able to register yourself with the Support Forum HERE.
Please note, this is an optional plugin, which means you can setup your WordPress site without it, simply by using the "U-Design" themes' core features and shortcodes, it's not required by the theme to work properly. We could provide assistance with understanding some of its features, however, bugs and more serious issues with the plugin will ultimately be addressed by the plugin's author in consequent updates. In that respect we'll be providing updates of the plugin (whenever available) with every future release of the "U-Design" theme. - Essential Grid - Essential Grid is a premium plugin for WordPress, an all-purpose grid building solution that allows you to display various content formats in a highly customizable grid. Possible applications range from portfolios, blogs, galleries, WooCommerce shops, price tables, services, product sliders, testimonials and anything else you can imagine. (Essential Grid Documentation)
- Slider Revolution Plugin - This Slider Revolution plugin is a premium responsive slider. If you need a slider for any of your page feel free to use it. (Slider Revolution Documentation)
- WooCommerce - is an open-source e-commerce plugin for WordPress. It is designed for small to large-sized online merchants using WordPress. This plugin is not required for the theme to function, it is only required for the shop demos "TeaTime" and "UStore" that were built with it.
- WP-CommentNavi - This plugin provides pagination for comments.
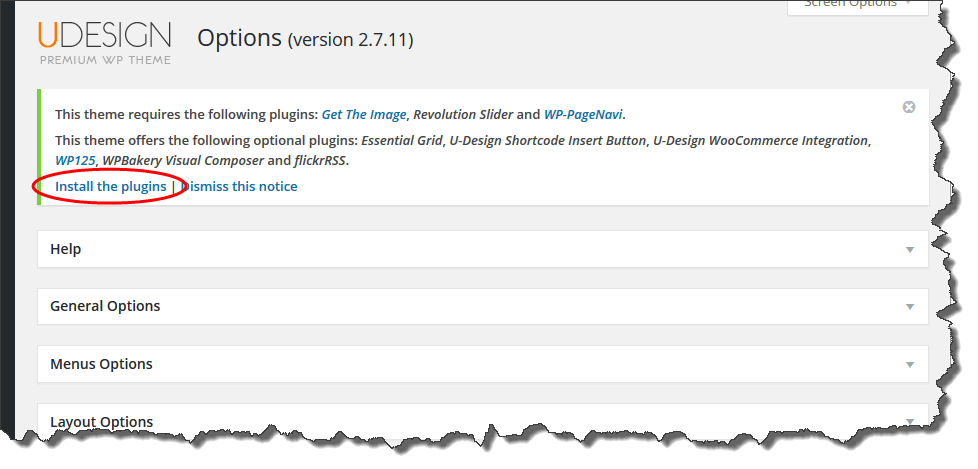
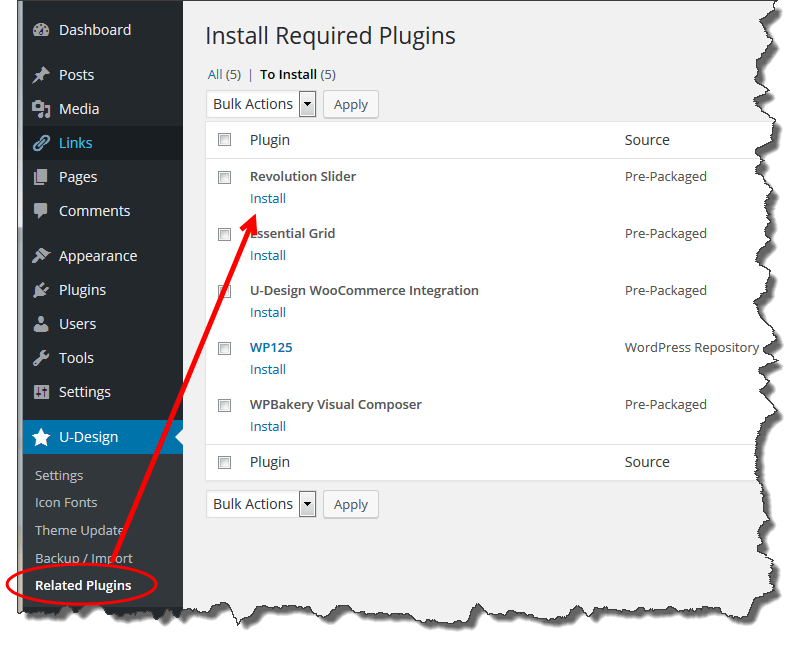
The U-Design theme has been prepared to work with a few additional plugins to enhance its functionality. Once you install the theme you should see a notice near the top of the page letting you know of the plugins related to the theme, some are required and some are optional (recommended). Click on the "Install the plugins" link:
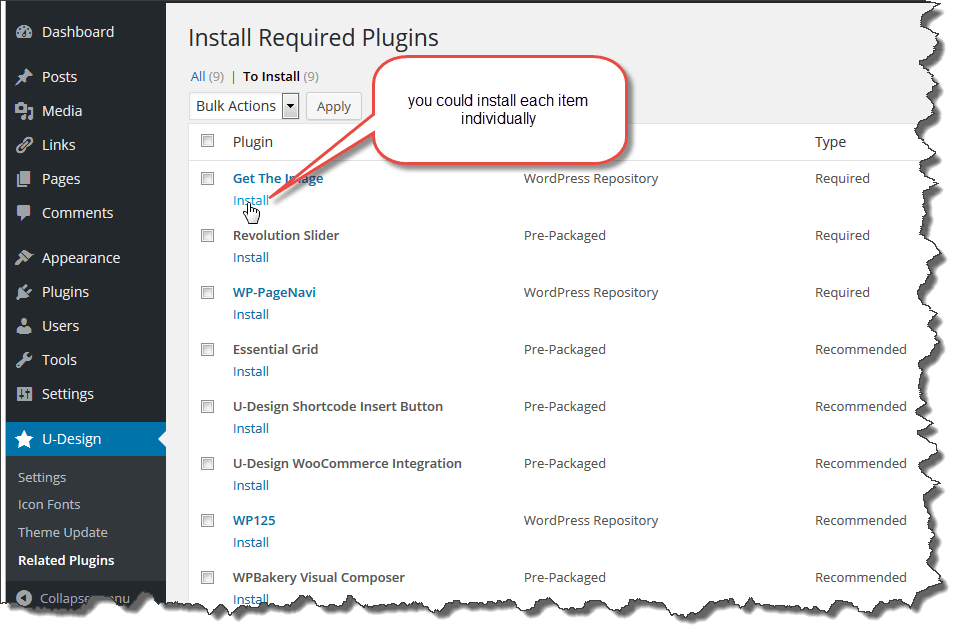
At the next page you could use the "Install" link to install individual plugins:
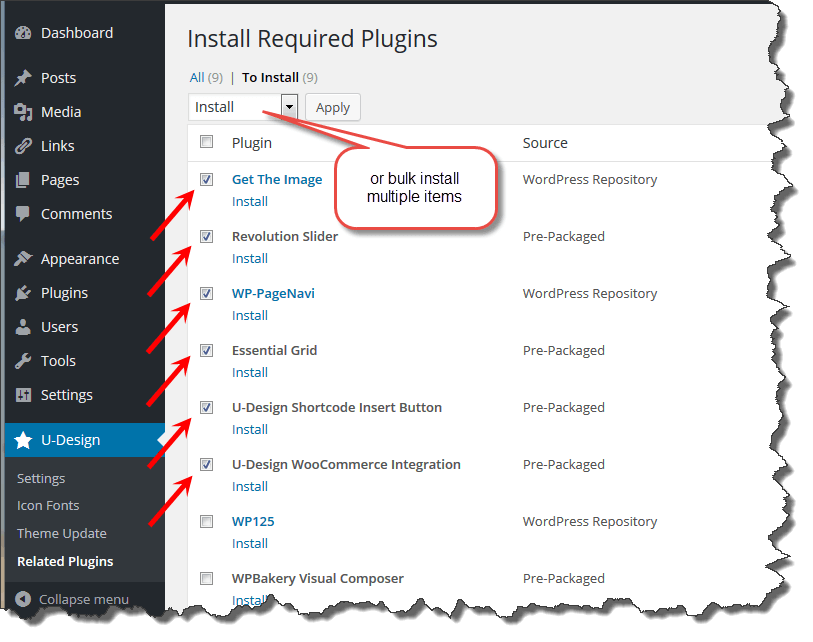
Conveniently, you could install multiple plugins in bulk:
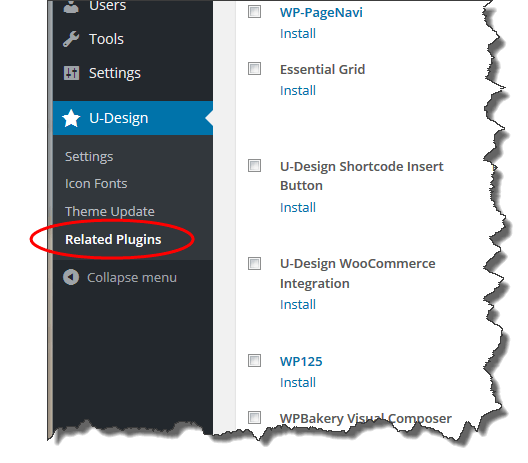
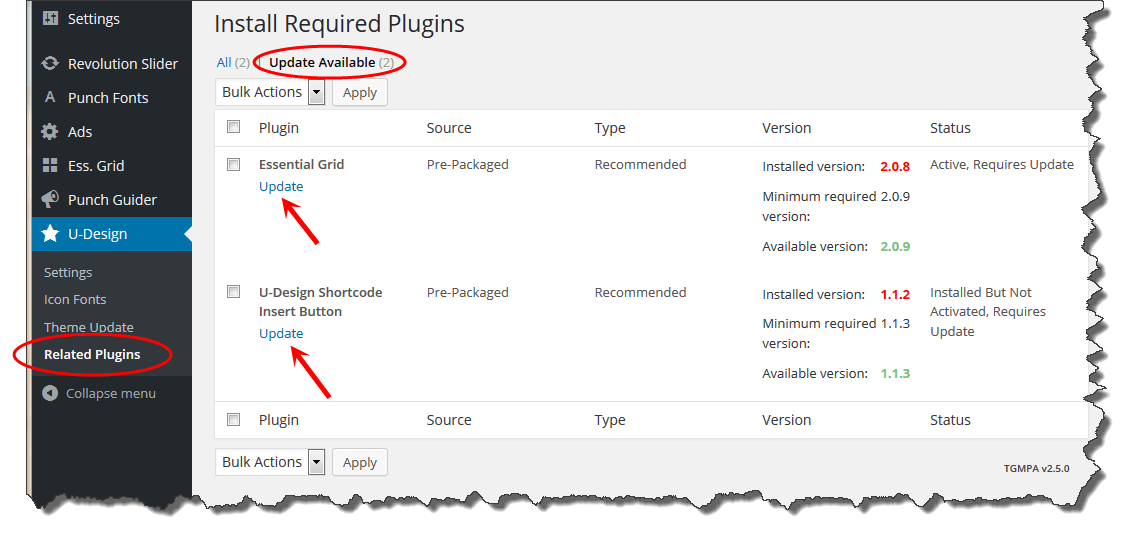
Alternatively, you could access the plugins' install page from the U-Design → Related Plugins menu: (please note, this link will only list the plugins for the "U-design" theme and will only be visible if there are any plugins to be installed, activated or updated)
Plugins Update Instructions:
To update plugins that are related to the theme just click the "Update the plugins" link in the notification message:
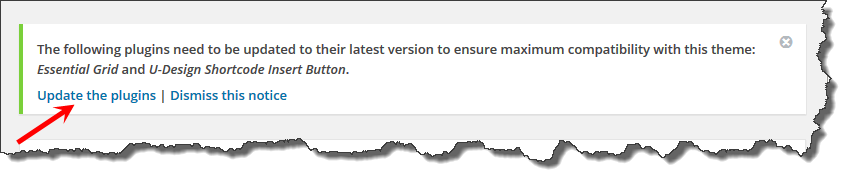
This will take you to the "Related Plugins" page where you can perform the updates:
C) Front Page - top
Without any content the Front Page will only display the default slider and the footer.
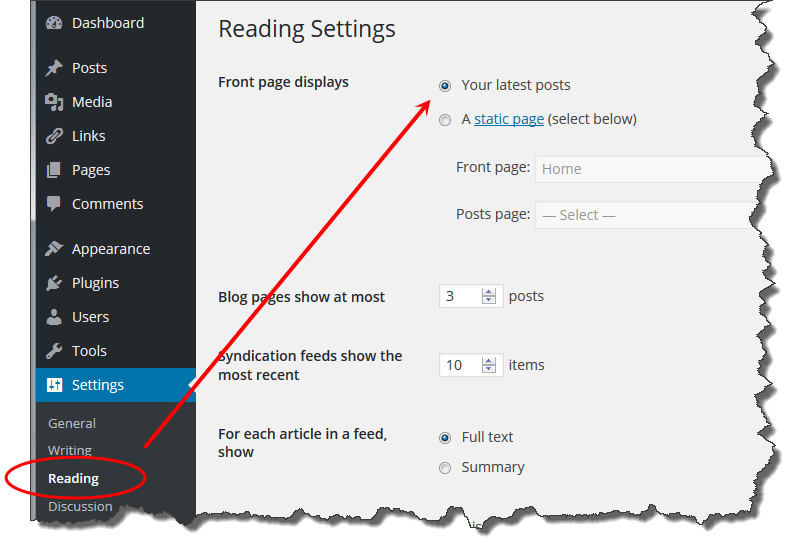
The Home page can be set up in one of two ways:
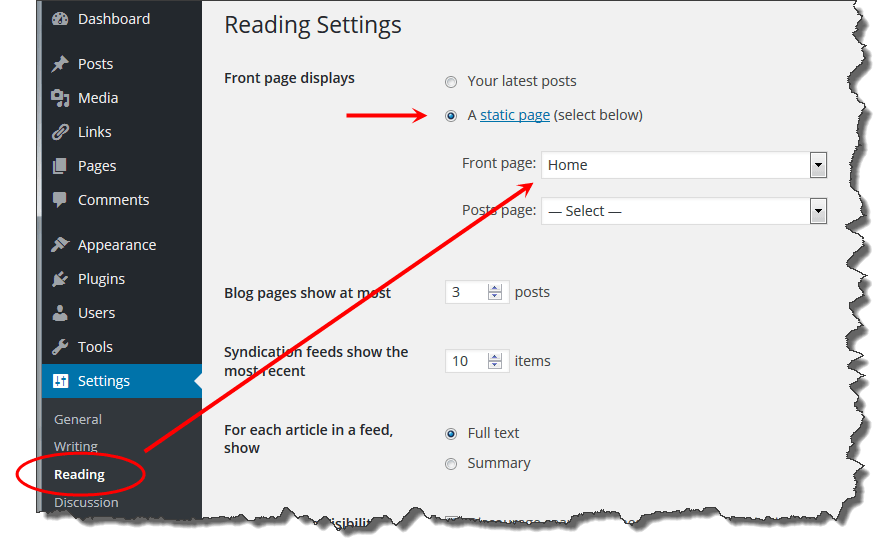
- Widgetized Home Page (default): Settings → Reading → Front page displays and select "Your latest posts":
- Static page as Home Page: Go to Settings → Reading → A static page (select below) → Front page: → Choose your page from the dropdown menu.
For example, if you would like to set a static page called "Home" as your home page do the following:
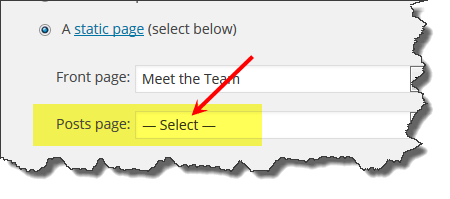
PLEASE NOTE: When working with Option 2 above, make sure to leave the "Posts Page:" option set to the default "--Select--". This is important and will ensure that the Blog section to work properly within the theme:
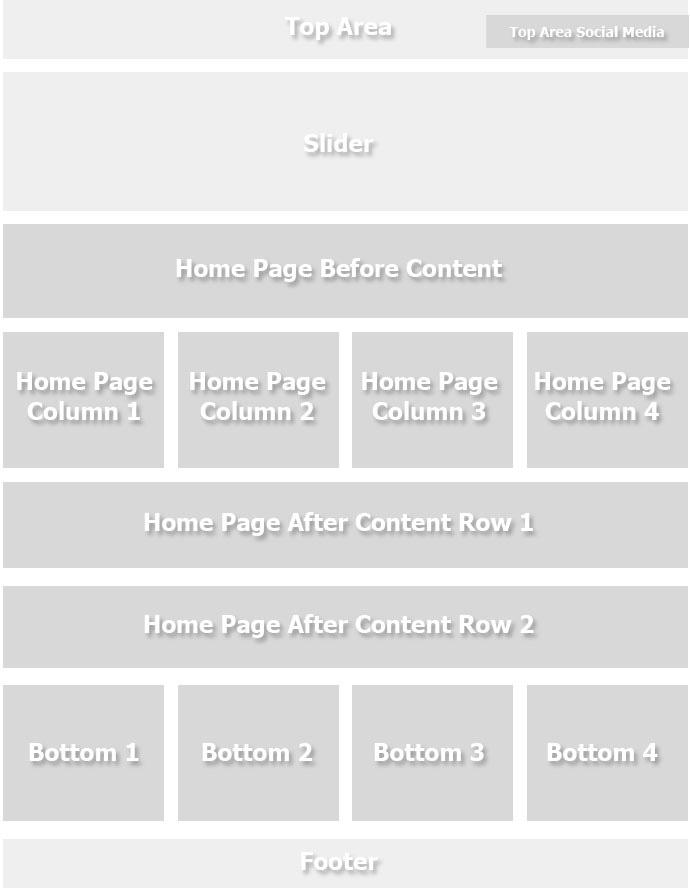
The first method (Widgetized Home Page) is the one that gives you the most flexibility because the home page consists of Widget Areas that can be used and combined in various ways, here's a map (the Widget Areas are marked in darker gray):
For various theme widths please refer to the Additional Information section.
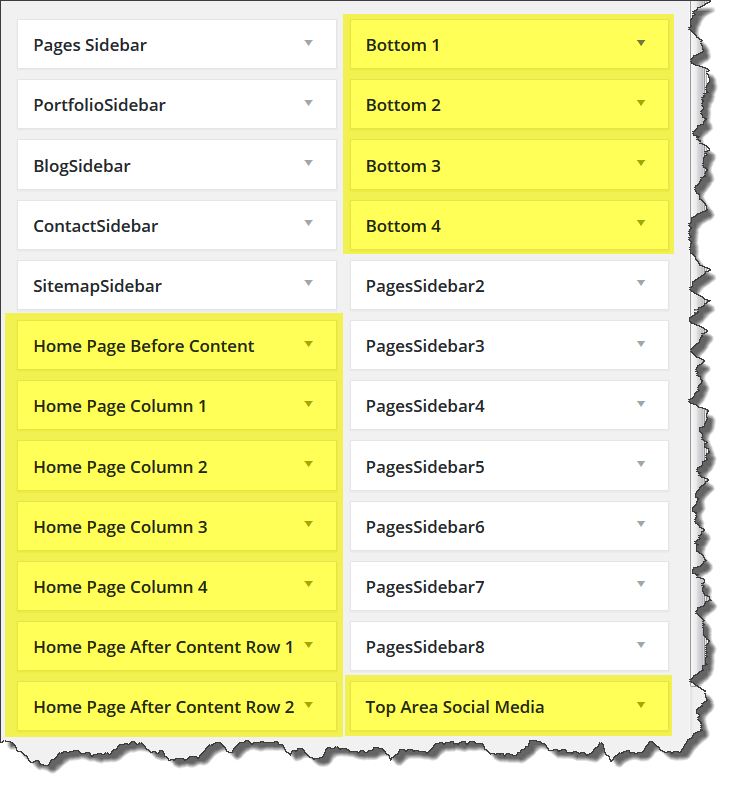
To get some content into the Widget Areas go the WordPress admin backend Appearance --> Widgets and drag-and-drop widgets to the Widget Areas associated with the Front Page. Those are highlighted in yellow:
For example, drag-and-drop a "Text" widget into one of the Widget Areas, insert some text into it, save it, then go to the home page (front end) and refresh it to reflect the changes. The above listed widget areas will automatically resize to extend the full width of the page. Only the "Home Page Column 1" has the option to stay fixed width. You could set that under the U-Design -> General Options -> Home Page Column 1. By default fixed width for "Home Page Column 1" widget area is disabled. The idea behind this options is that in some cases you might want to have this widget area to serve as a left sidebar on the home page, or display the latest posts in it, etc. and use the remaining space for wider content, I'm sure you could put your creativity to good use here. :)
For instance, the "Home Page Before Content" widget area in the theme's demo site has been built with a "Text" widget (the title fiend was left blank), and I used some inline styling (inline CSS) to get the look I wanted.
Note: You can have the code I used for the 7 Home Page examples you see in the theme's demo site, for that go to Get the Code page and follow the instructions there.
D) Front Page Sliders - top
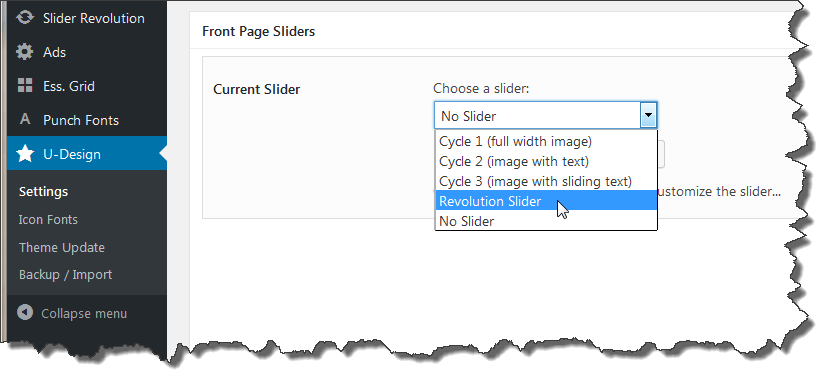
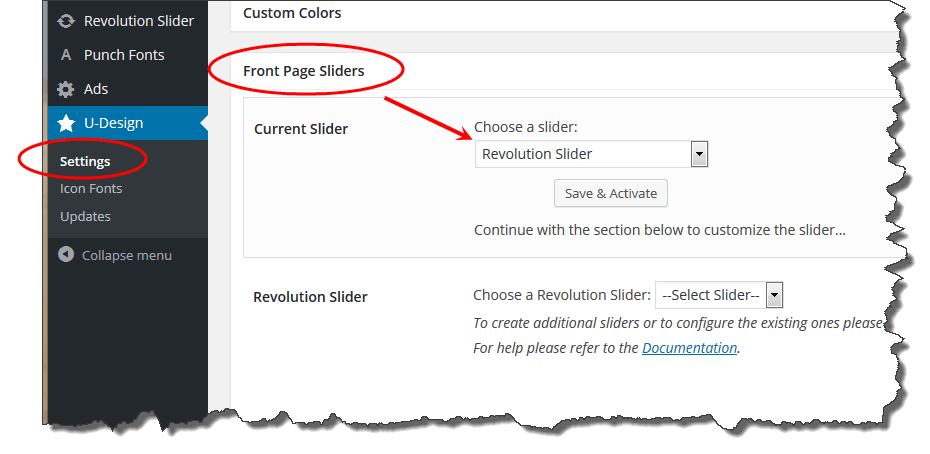
The U-Design theme comes with four sliders: Cycle 1 (full width image), Cycle 2 (smaller image with text and button), Cycle 3 (three layers of sliding images and text) and Revolution Slider (which is a layers based slider). The sliders could be configured from the theme's options page, for that go to U-Design Options --> Front Page Sliders.
Please Note: Slider image dimensions are very specific, please review (see below) the requirements for the Slider you have chosen and crop the image to the EXACT specifications indicated.
- Revolution Slider - top
The Revolution Slider plugin comes pre-packaged with the theme, you just need to install and activate it. If you haven't installed it already just do the following:
For more information on required plugins and installation instructions, please refer to the Related Plugins section.
To assign the Revolution Slider with "U-Design" theme, select it from the menu:
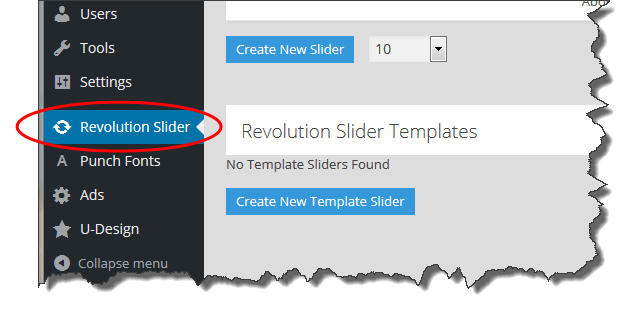
To create your slides follow the onscreen instructions or go directly to the Revolution Slider section:
For further instructions and additional information on how to setup your slider, please refer to the Revolution Slider's own documentation HERE and its description page on CodeCanyon. For support, please post your questions at the theme's Support Forum. You should be able to register yourself with the Support Forum HERE.
Also, a good start with the slider is the Slider Revolution Beginner Video Guides & Tutorials
Revolution slider UPDATE Instructions:
Before you begin make sure to export all your existing sliders for safe keeping in case something goes wrong.
Besides the quick and easy general method to udpate a plugin related to the theme like the Revolution slider, there could be situations when this method doesn't work or a manual update is required in which case refer to the FTP method below:
- Manual FTP Method - Another way to update the Revolution slider plugin would be the FTP Method, in which case you will need to replace the sliders' files on your server located under
wp-content/plugins/revslider.
1 ) In order to get the latest version of the 'Revolution Slider' plugin, you will need the latest release of the U-Design theme which you can download from your ThemeForest account that you used to purchase it. Unzip the "u-design.zip" file and go to the folderu-design/lib/plugins/where you will find the latestrevslider.zipfile.
2 ) Unzip the "revslider.zip" file, so that you now have a folder namedrevslider
3 ) Open your favorite FTP program, and navigate to the following directory:
wp-content/plugins/revslider/
4 ) Delete all of the files and folders in this directory, and replace them with all the files and folders from therevsliderfolder from step 2 ) above. - Special Case - Alternatively, if none of the above listed methods work you most likely have a really old version of the plugin in which case you may try the following method to update the Revolution slider described in this tutorial.
How to add Revolution slider to a page or a post:
If you would like to insert an instance of the slider on top of any page or Post that can span the full width of the browser window and not be limited by the content width, you can do that by specifying a custom field for that page or post paired with a shortcode of the slider you want to use. For more information on the specific custom field that you need to use in this case please refer to the Slider related custom fields. - Manual FTP Method - Another way to update the Revolution slider plugin would be the FTP Method, in which case you will need to replace the sliders' files on your server located under
- Cycle 1 Slider - top
With the Cycle 1 slider you can use the automatic image uploader or you could specify a URL or path to your images. Either way it should be fine. Slide image dimensions: with frame enabled (default state) image dimensions are 914px by 374px (width by height). Without the frame image dimensions are 940px by 400px. Depending on which option is selected, create and upload images with the corresponding dimensions for optimal quality.
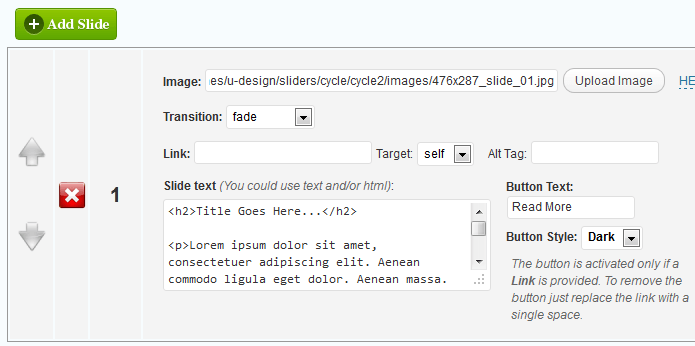
- Cycle 2 Slider - top
The image size is FIXED to 476px by 287px (width x height). If you use a larger image then anything outside 476px by 287px area will not be visible. In the slide text field you could use plain text or some html, I have also made sure that you could use the typography list styles included with the theme (see theme's typography). The button will only display if a link is inserted in the Link field and the link will be automatically applied to the button. You can also choose from 'light' and 'dark' button styles.
- Cycle 3 Slider - top
The image size is FIXED to 940px by 430px (width x height). I have provided the PSD templates for your convenience to use to generate the slider images. The first one is a jpeg, this image is the base, it kind of serves as the background image against which the second image and text will slide over. The second image is a transparent png which is meant to slide over the first image either with some text or some smaller graphic but you need to maintain the transparency and try not to cover the entire first image with the second one's graphics to get the desired effect. The "Slide text" field is for the third component (the sliding text). The canvas area for the text is also 940px by 430px, the only difference now is that you have to manipulate the text block with HTML. I have provided as many inline CSS properties as I can think of to give you a great start in being able to manipulate the text block yourself, feel free to experiment with those properties. And if at any time you need the default text, you can simply create a new slide and it will come with the default text for your reference:

E) Import Demo Content - top

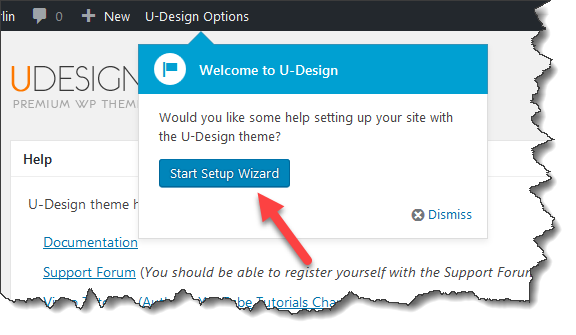
When you install and activate the U-Design theme initially you will see a pointer near the top:
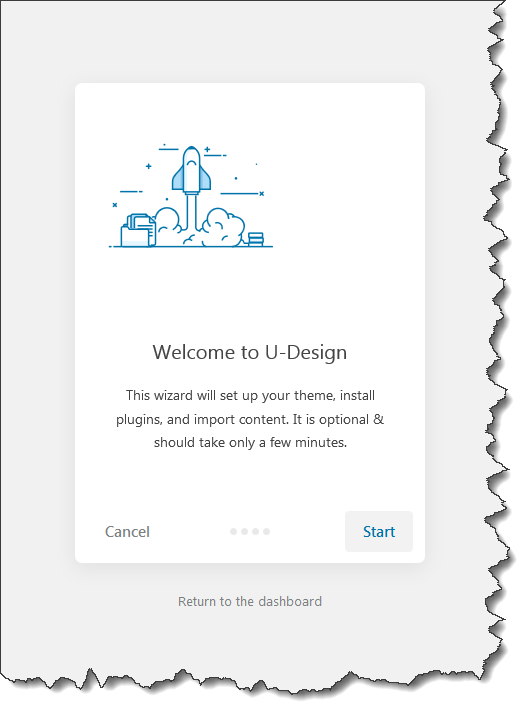
Clicking the button will launch a wizard interface that will walk you though each step:
You may also run the wizard at any time and access other options for importing demo content through this menu:

The "Import Demo Data" page:

For alternative import demo method please refer to this thread in the support forum.
F) General Options - top
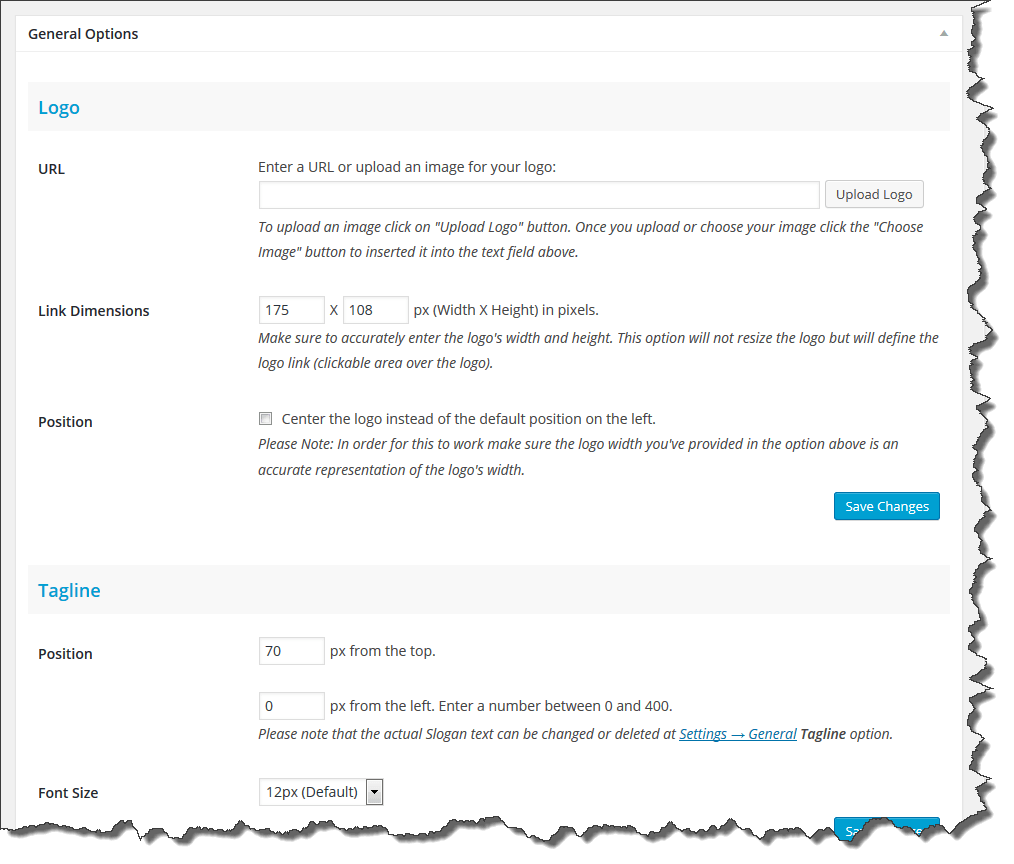
Custom Logos: Using the "Top Area Height" setting you can resize the top area of the site to accommodate your custom logo size. Depending on your logo, you might have to nudge the slogan position a bit to fit perfectly with the logo. Use the Slogan Position fields for that.
Logo Dimensions: Just a quick note about the Logo width and height. What is important to understand is that by specifying the width and height of the logo, you will not stretch/zoom or enlarge/shrink your logo, the two settings are used to define the logo link click-able area. Generally those should match your actual logo image width and height. In some cases if you need to lower the logo a bit from the top, you can do that be giving a greater value for the height.
G) Portfolio Section - top
A good place to start with setting up a portfolio section(s) is the video tutorials:
U-Design Portfolio Section Setup Part 1 of 2
U-Design Portfolio Section Setup Part 2 of 2
You may find discussions around this subject in the theme's support forum HERE. You can create your account in this page.
Note: Sortable Portfolios are not discussed in the videos above, however, the concept of settings them up is the same, there's also more information on Sortable Portfolios further down in this section.
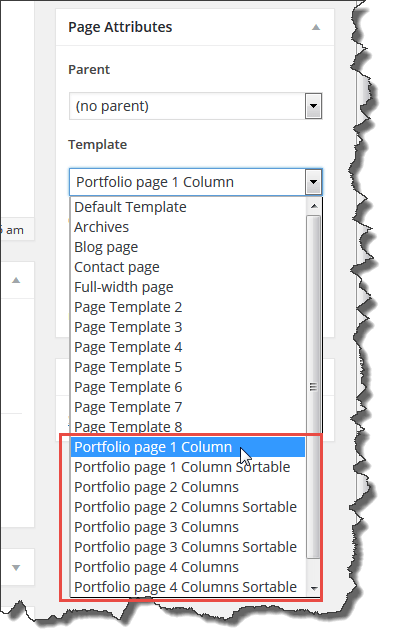
To setup Portfolio Section(s), start with creating a new page, e.g. Portfolio, or Videos. You can call it anything you like. As you have the page open for editing, choose one of the available portfolio templates as shown below:
Save the page(s) and go to U-Design --> Portfolio Section and follow the instructions there:
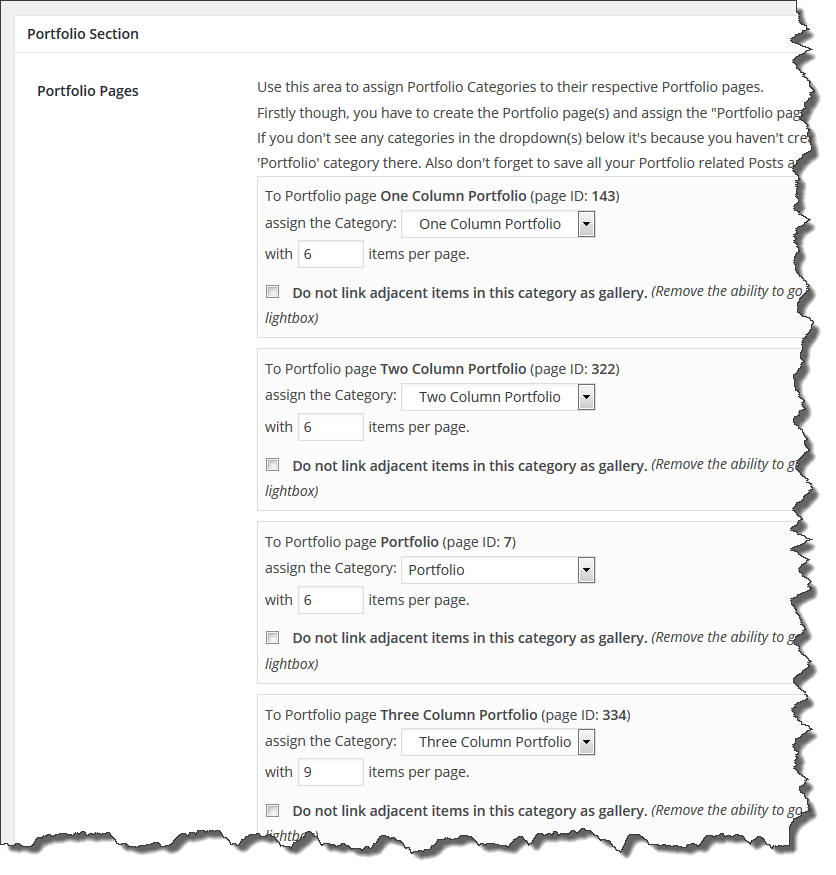
Before you get the page above you should setup your Portfolio categories make sure that they are not empty, each category needs to have at least one Post assigned to it, WordPress will hide a category if it's empty, that's why it's important to have at least one Post assigned a category. Then you can come to the Portfolio section shown above and as described in the image above, you need to associate a page with a category.
At this point you're almost done, the last thing would be to setup the Portfolio thumbnails. By default the theme will grab and generate the thumbnails for you.
The theme will:- look for an image by custom field.
- if no image is added by custom field, check for a post image (WordPresss 2.9+ feature).
- if no image is found, it grabs an image attached to your post.
- if no image is attached, it can extract an image from your post content.
- if no image is found at this point, it will display a default image "Not Available".
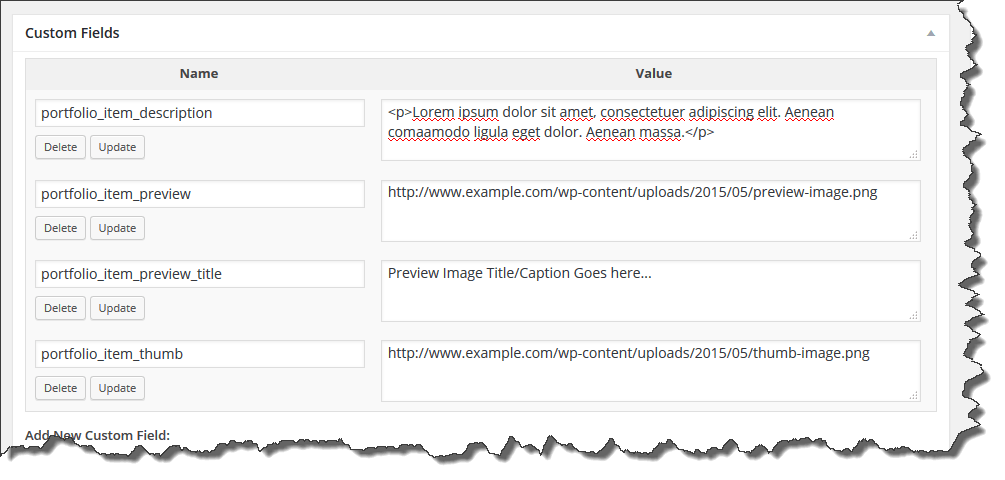
If you prefer to use the custom field method add a new custom field named: portfolio_item_thumb. In the Value field, you'll need to add the URL to the image.
For the Preview image or video or flash of your portfolio item you can use a custom field portfolio_item_preview.
- portfolio_item_thumb (this is the item's thumbnail image)
- portfolio_item_preview (this is the item preview - it could be an image, video or a flash file)
- portfolio_item_description (this is the item description text)
- portfolio_item_preview_title (this is the item capture text shown underneath the preview item)
- portfolio_item_link (which allows to link directly from the thumbnail to another page or site rather than displaying a preview image)
- portfolio_item_link_target (use this custom field to open the link in a new window, for that set the value field to "_blank" without the quotes)
- portfolio_item_link_rel (use this custom field to specify a link relation attribute "rel" for Portfolio thumbnails, example value: "nofollow" without the quotes)
- portfolio_item_image_attachments (use this option to pull all the images attached to a single post to the Portfolio, example value: 'yes' without the quotes)
- portfolio_item_offset_image_attachments (use this to skip the number specified of image attachments, example value: '0' or '1' without the quotes)
- portfolio_filter_category - Sortable Portfolio Only (adds the ability to sort by "child" category, possible values: '0' or '1' without the quotes)
- portfolio_filter_sorting - Sortable Portfolio Only (adds the ability to sort by Alphabetical and Ascending/Descending order, possible values: '0' or '1' without the quotes)
- portfolio_filter_tags - Sortable Portfolio Only (adds the ability to sort by Tags used in the Portfolio posts, possible values: '0' or '1' without the quotes)
Note: If you don't see the custom fields area, you need to make it visible by going to the "Screen Options" tab located in the top right corner of the post edit page:

Note: The Custom Fields' names are case-sensitive.
To pull all images attached to a single post to be added to the portfolio you will need to use the following two custom fields:
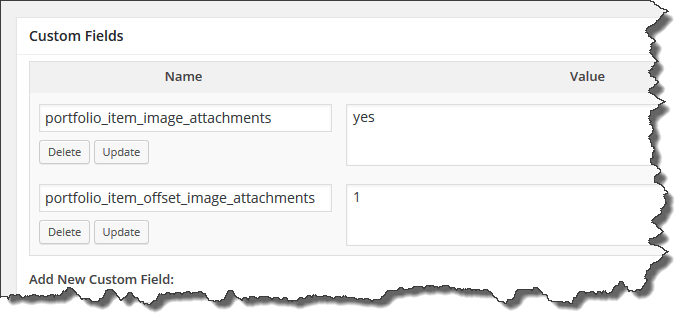
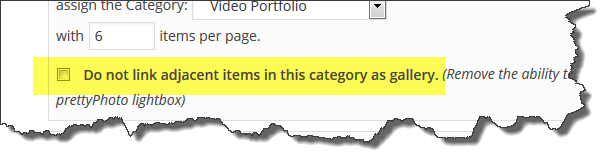
Use the custom field portfolio_item_image_attachments with value 'yes' (without the quote). Optionally you can offset the number of images to be pulled from the post by specifying the custom field portfolio_item_offset_image_attachments and specify any number as value. Optionally you can disable the linking of Portfolio page items when opened with prettyPhoto lightbox, the option for this is located under the theme's "Portfolio Section":
The Post's title could be positioned either above or below each thumb. This is convenient in case that you have really long titles which could push the thumb image down a bit and misalign the thumbs horizontally. In this case the solution would be to place the titles below the thumbs.
You could also add a "Read More" button or list styles from the theme's typography by using shortcodes or plain HTML.
Sortable Portfolio Custom Fields
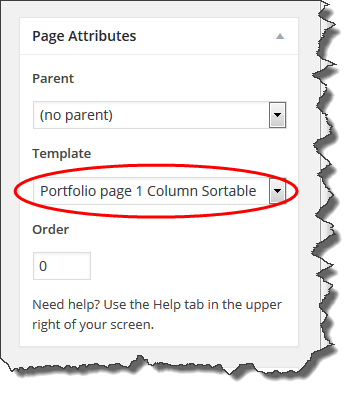
"U-Design" theme also offers sorting of the items. To enable the sortable portfolio functionality, please choose the appropriate page template for that. For example, if you would like the 1 Column Sortable, select accordingly from the Page Attributes:
Then, add to that page the custom field sort functions you would like:
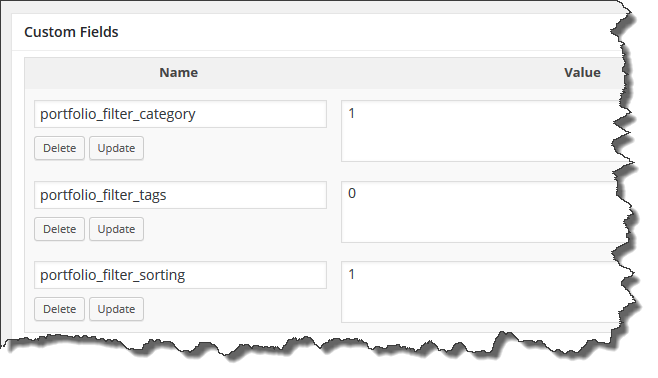
- portfolio_filter_category (adds the ability to sort by "child" category, possible values: '0' or '1' without the quotes)
- portfolio_filter_sorting (adds the ability to sort by Alphabetical and Ascending/Descending order, possible values: '0' or '1' without the quotes)
- portfolio_filter_tags (adds the ability to sort by Tags used in the Portfolio posts, possible values: '0' or '1' without the quotes)
All three portfolio filter custom fields have the option to be set to either 0 (zero - off) or 1 (one - on). If a custom field is not present, this will be interpreted as 1 (one - on). These custom fields can only be used with a Sortable Portfolio Page (meaning a page that's been assigned a Sortable Portfolio Page template as discussed above) - they cannot be used with the individual posts that make up the Portfolio content. These custom fields are also independent of each other, meaning you don't have to add all three, you can only add the one you need. Their main purpose is to be used to disable or remove a filter or the sorting functionality from the page they are used on.
NOTE: If you are using WPML, please remember to add the three above mentioned custom fields in each of of the applicable language pages of that Portfolio.
Once you have completed the Page setup, assign the Page to the Portfolio theme section as per the standard Portfolio setup instructions.
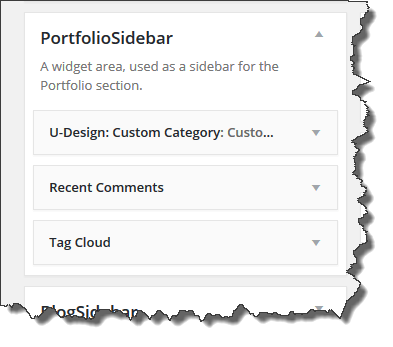
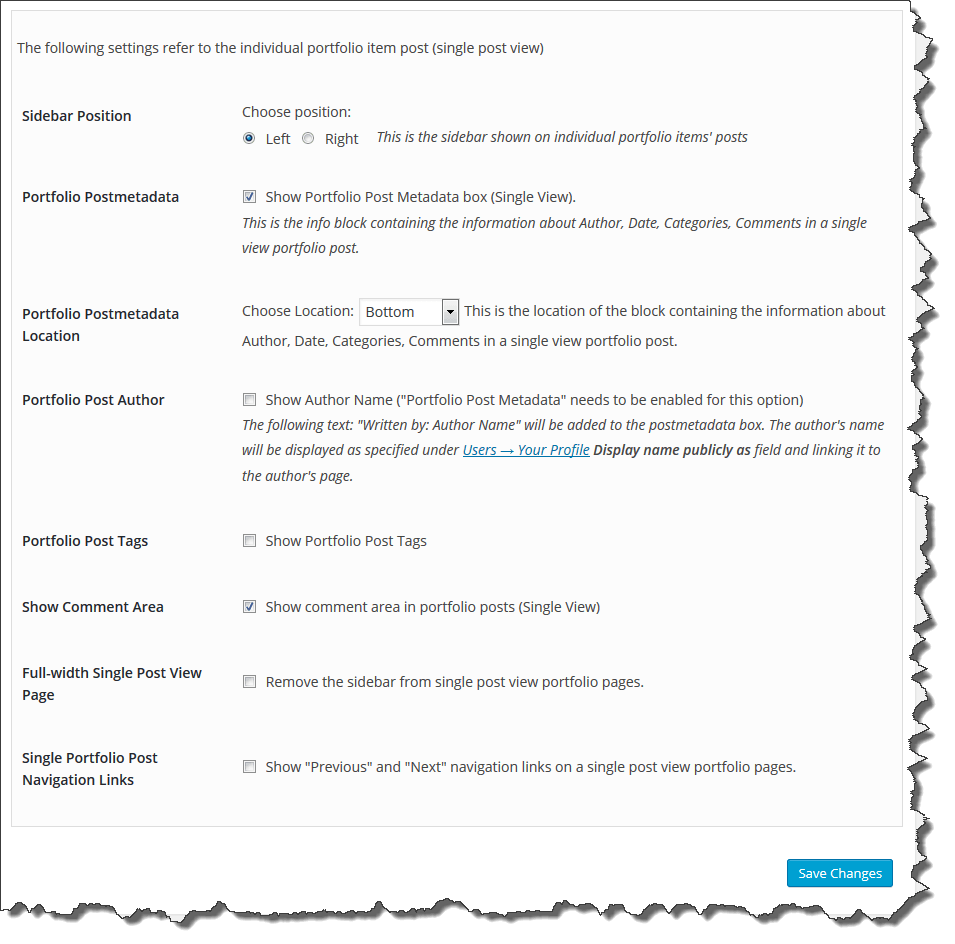
The Posts used to hold each individual Portfolio item have a sidebar when viewed in the browser as posts. The sidebar displayed could be changed to be either left or right side position. You can set the position from the U-Design --> Portfolio Section. Also the sidebar could be customized further by adding various widgets to it from Appearance --> Widgets and drag-and-drop widgets into the "PortfolioSidebar" widget area like so:
Back to the U-Design --> Portfolio Section. As shown in the image below in this section the postmetadata, author name and the comment area could be excluded from the single view post:
H) Blog/News Section - top
IMPORTANT NOTE: If you have selected a static page as home page, make sure to leave the "Posts Page:" option set to the default "--Select--". This is important and will ensure that the Blog section to work properly within the theme:
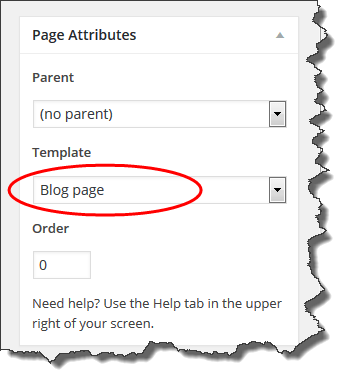
Next to continue with setting up your Blog section, create a Page called Blog or News or whatever you would like to call it, give it just a title and no content, and assign the template "Blog page" to it like so:
You can also change the sidebar position for the Blog pages to be either left or right. You can do that from the U-Design --> Blog Section
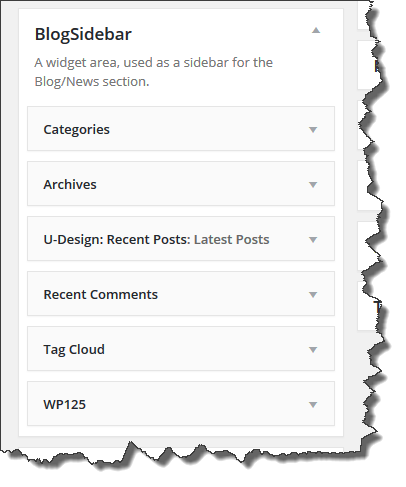
To customize the Blog pages' sidebar, go to Appearance -> Widgets and drag-and-drop widgets you'd like to use into the "BlogSidebar" widget area, here's an example:
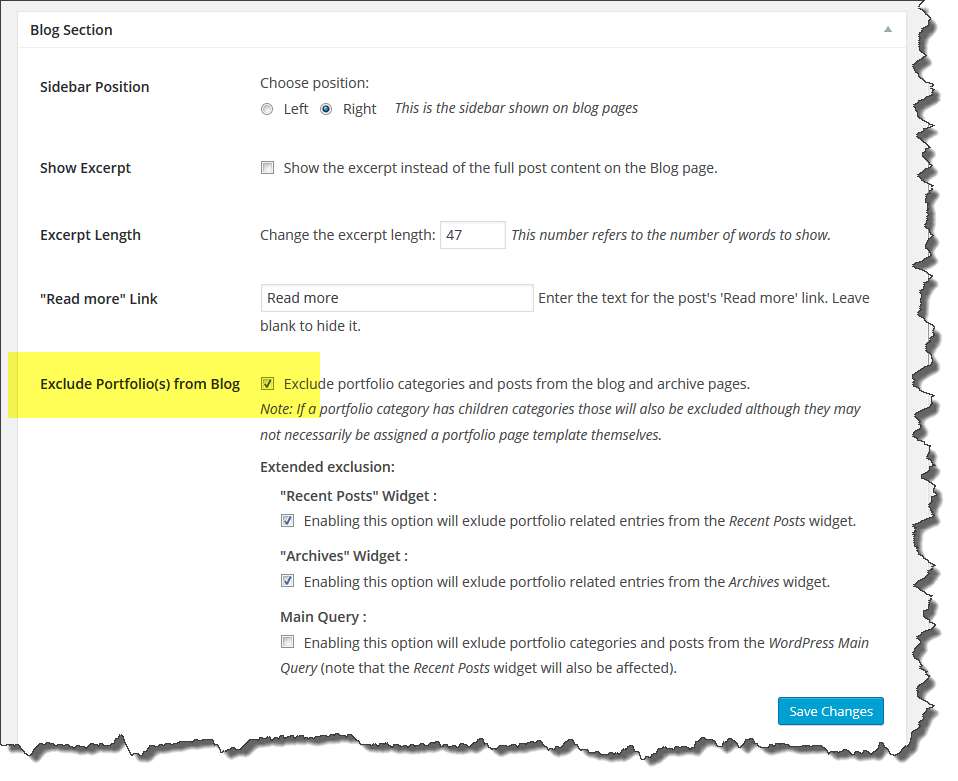
By default the blog posts displayed under the Blog section will exclude all posts that are in some way related to any of Portfolio section(s). If you would like to include them uncheck the "Exclude Portfolio(s) from Blog" option.
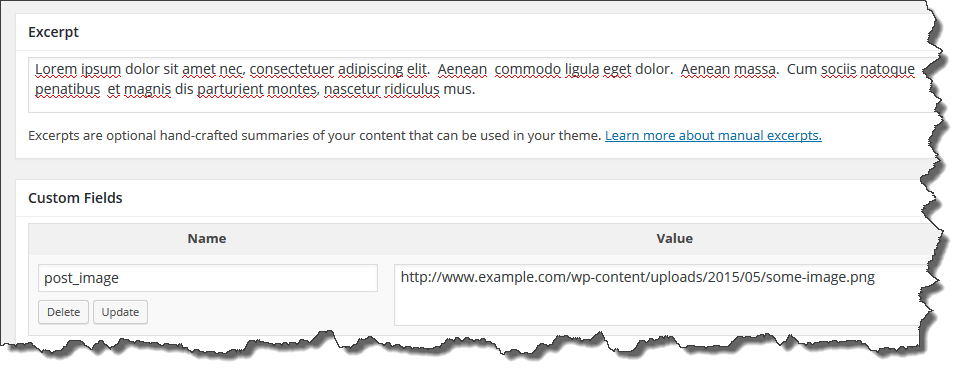
By default the Blog section will display the posts with short excerpts and a "Read more" button. However to show regular post content (not the excerpt) uncheck the checkbox "Show Excerpt" shown in the image above to accomplish this. To display a post with an image on the Blog page you need to add a Post specific image. Use the Custom Field post_image (case-sensitive) to specify the URL to the image (see below for example). For best results you might want to upload a larger image. The theme will crop and resize the image to as required. Here's an example of a post with custom excerpt and a post image. You don't have to fill in the "Excerpt" field, if you leave it empty the theme will automatically generate the excerpt for you:
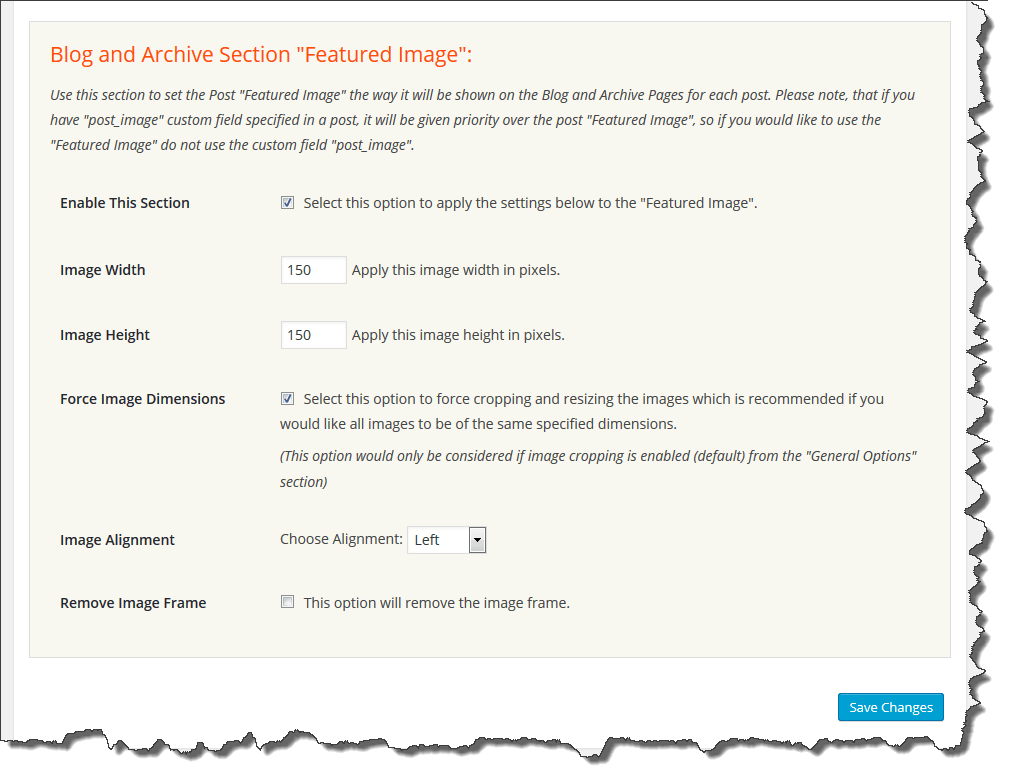
Alternatively, another way to display an image representing each post in the Blog page is by enabling the "Featured Image", please refer to the screenshot below. Of course using this feature assumes that you have setup an image as "Featured Image" in a post. The advantage of this method is that you could easily resize the images as well as set their alignment (left, center, or right).
I) Contact Page - top
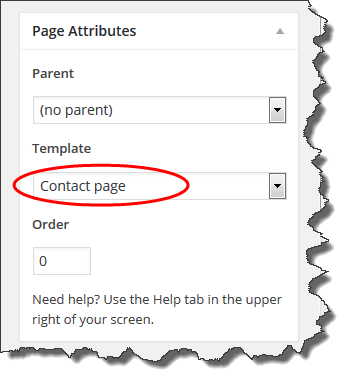
To setup a Contact page, create a Page called Contact and assign the template to it called "Contact page":
The content you enter under the Contact page will always show first in the page.
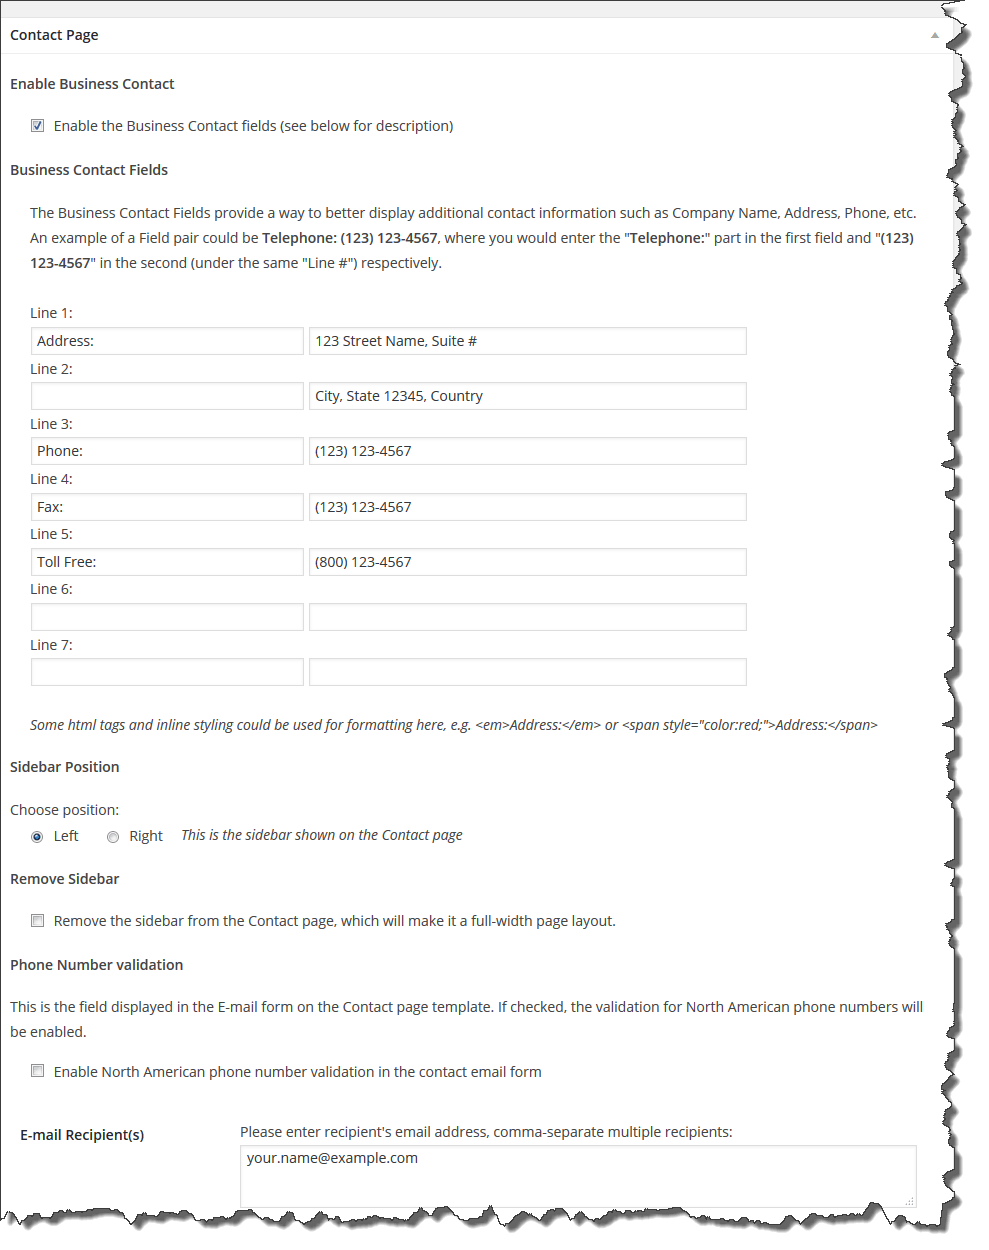
You can setup business contact information under U-Design Options --> Contact Page, that will be displayed in a table-like nicely formatted way, the configuration for that and other options could be seen here:
The bottom part of the Contact Page Options allows you to enable ReCAPTCHA for extra security. To use reCAPTCHA you must get an API public and private key from https://www.google.com/recaptcha/. For the rest follow the instructions on the screen:

For more information on how ReCAPTCHA works please visit https://www.google.com/recaptcha/
"anti-spambot" email shortcode
As additional security measure, the theme offers an "anti-spambot" email shortcode, which may be used to display obfuscated email addresses. This feature would make it much harder for spam bots to harvest unprotected email address that you might have in your content, so always a good idea to use the shortcode for extra protection. Here's an example use:
[safe_email]john.doe@example.com[/safe_email]
Google Maps
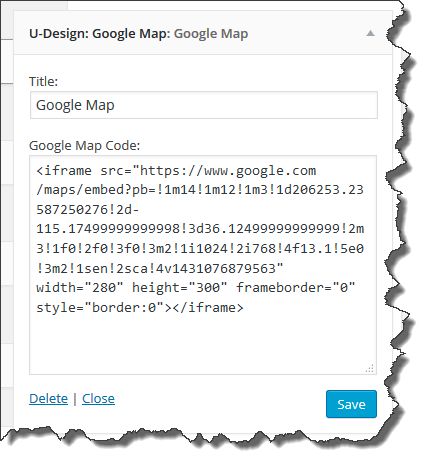
The Contact Page template comes with its own sidebar called ContactSidebar. To add Google Maps in the sidebar use the U-Design: Google Map widget.
- Open Google Maps (http://maps.google.com/)
- Make sure the map or Street View image you'd like to embed shows up on the map.
- In the bottom right corner, click the settings icon and then select "Share or embed map":

- Click "Share or embed map". At the top of the box that appears, choose the "Embed map" tab. Then select "Custom size". Now set the width to 280 for the theme's default sidebar width or whatever width suits your needs. The height could be anything:
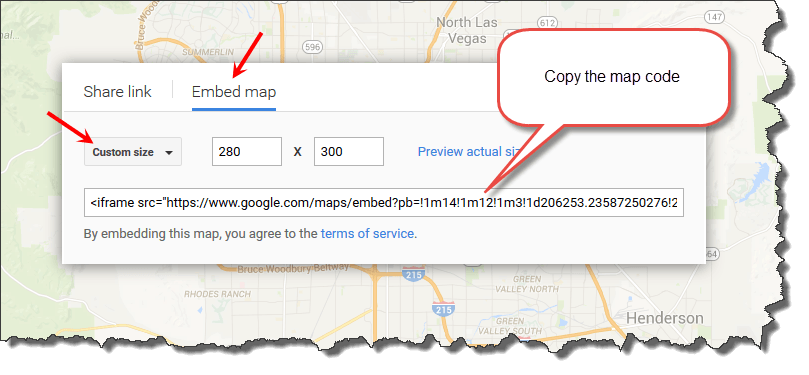
- Then paste the map code into the "U-Design: Google Map" widget and you're done.
For further help visit Embed a Map - Google Maps Help
J) Icon Fonts - top
Icon fonts give you scalable vector icons that can instantly be customized just like you would regular fonts. The theme offers:- Font Awesome
- Fontello (an icon fonts generator)
The Icon Fonts section of the theme could be accessed through the U-Design → Icon Fonts submenu:
![]()
Here's a quick video tutorial on Fontello usage with uDesign theme:
By default the theme comes with Font Awesome, Fontello on the other hand would require you to hand-pick your icons and upload them into the theme as per the instructions. Both, the Fontello and Font Awesome sections can be accessed through their own tabs:
![]()
Both Fontello (if installed) and Font Awesome icons can be accessed in the WordPress page/post editor:
![]()
This option provides a convenient way to select, style and insert the icon of your choice into the page/post editor either as shortcode or HTML:
![]()
Example uses
You may insert the icons directly with an <i> tag:
Fontello example: <i class="icon-music"></i>
Font Awesome example: <i class="fa fa-music"></i>
The advantage of using the "i" tag over shortcode is that you get a visual feedback of what the icon looks like in the "Visual" editor in WordPress,
however I should mention that in some cases when you have just the "i" tag and no other text around it WordPress might remove it,
in those cases it's best to use the shortcode version.
[udesign_icon_font name="fa fa-refresh"]
[udesign_icon_font name="icon-spin3" color="#dd9933"]
[udesign_icon_font name="fa fa-refresh" color="#dd9933"]
[udesign_icon_font name="icon-spin3 animate-spin" color="#dd9933"]
[udesign_icon_font name="fa fa-refresh fa-spin" color="#dd9933"]
[udesign_icon_font name="fa fa-refresh circle-wrap" color="#dd9933"]
[udesign_icon_font name="fa fa-refresh" color="#4C4C4C" size="3.2em"]
fontello-ul class for Fontello icons, examples:
<ul class="fontello-ul">
    <li><i class="icon-check"></i>Fontello icons</li>
    <li><i class="icon-check"></i>can be used</li>
    <li><i class="icon-check"></i>as bullets</li>
    <li><i class="icon-check"></i>in lists</li>
</ul>
fa-ul and fa-li to easily replace default bullets in unordered lists with Font Awesome:
<ul class="fa-ul">
    <li><i class="fa-li fa fa-check-square"></i>Font Awesome icons</li>
    <li><i class="fa-li fa fa-check-square"></i>can be used</li>
    <li><i class="fa-li fa fa-spinner fa-spin"></i>as bullets</li>
    <li><i class="fa-li fa fa-square"></i>in lists</li>
</ul>
You may see more examples of Font Awesome uses here.
K) CSS Files and Structure - top
This theme has been implemented as a fixed width layout with the 960 Grid System. The full width of the template is 960px. For more information as to how the 960 Grid works, visit the 960 Grid System website.
Most CSS files are located in the <themes-directory>u-design/styles/ subdirectory. The CSS files are registered and included with WordPress via udesign_init_styles function and wp_enqueue_scripts hook in functions.php.
Most JavaScript are registered and included with WordPress via udesign_init_scripts function and wp_enqueue_scripts hook in functions.php.
The directory common-css/ and common-images/ stores all the CSS and images that apply to all styles and colors. Most of the 960 Grid System CSS files are in that directory as well.
L) Additional Information - top
More information, examples, code, shortcodes, etc. could be found at the U-Design demo site.
- Full-width Page Template: 920px of usable space
- A Page or Post with Sidebar: 600px of usable space in the content area + 280px in the sidebar
- "one_fourth" Column: 200px of usable space
- "one_third" Column: 276px of usable space
- "one_half" Column: 440px of usable space
- "two_third" Column: 598px of usable space
- "three_fourth" Column: 680px of usable space
- One and Two Column: 410px x 220px (width by height)
- Three Column: 248px x 148px (width by height)
- Four Column: 176px x 116px (width by height)
For a full list of available shortcodes and examples within the uDesign theme refer to the Shortcodes page.
If you have any questions post them to the theme's Support Forum. You should be able to register yourself with the Support Forum HERE.
Commonly asked questions and answers are available through the U-Design FAQs.
To obtain a copy of a U-Design child theme please refer to this forum discussion.
M) PSD Files - top
In the PSD_files.zip I've included subdirectories containing all the PSDs necessary to produce the corresponding theme styles.
All PSD files contain slices of the required images. In Photoshop you just have to go File --> Save for Web & Devices... select the slices you'd like to generate (Shift+click to select multiple slices), hit "Save", at the next "Save Optimized As" dialog box under Slices dropdown select "Selected Slices" and "Save".
N) Font Settings & Custom Colors - top
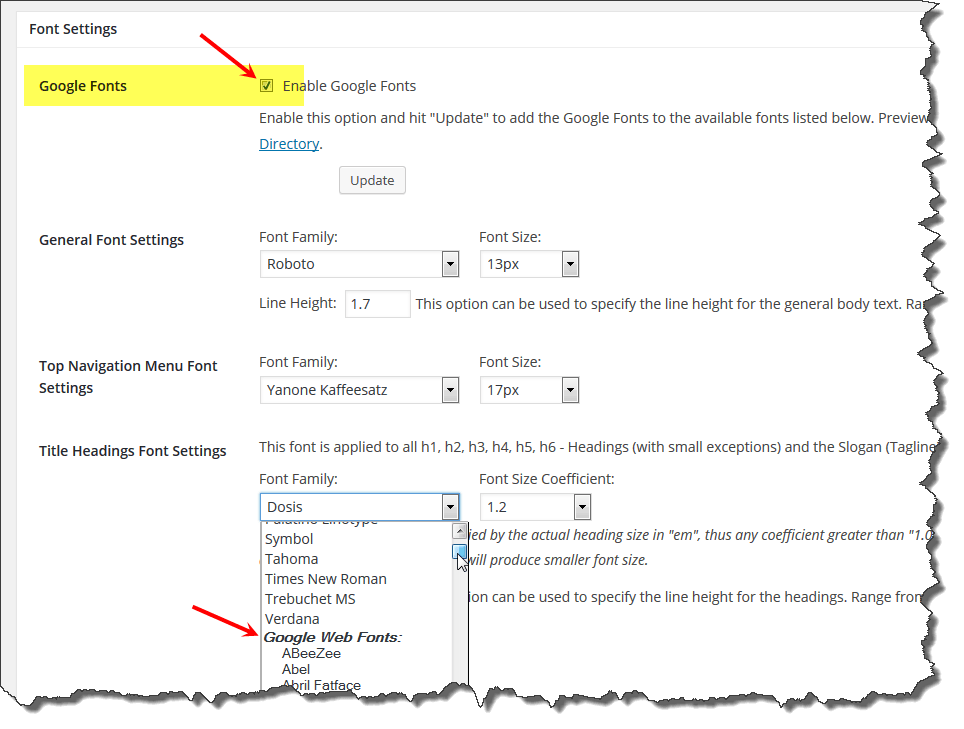
Choosing fonts for your website using the U-Design theme should be rather straight forward and intuitive. To select Google fonts make sure to enable them first and then save the page. This will make them available in the dropdown list of available fonts to choose from:
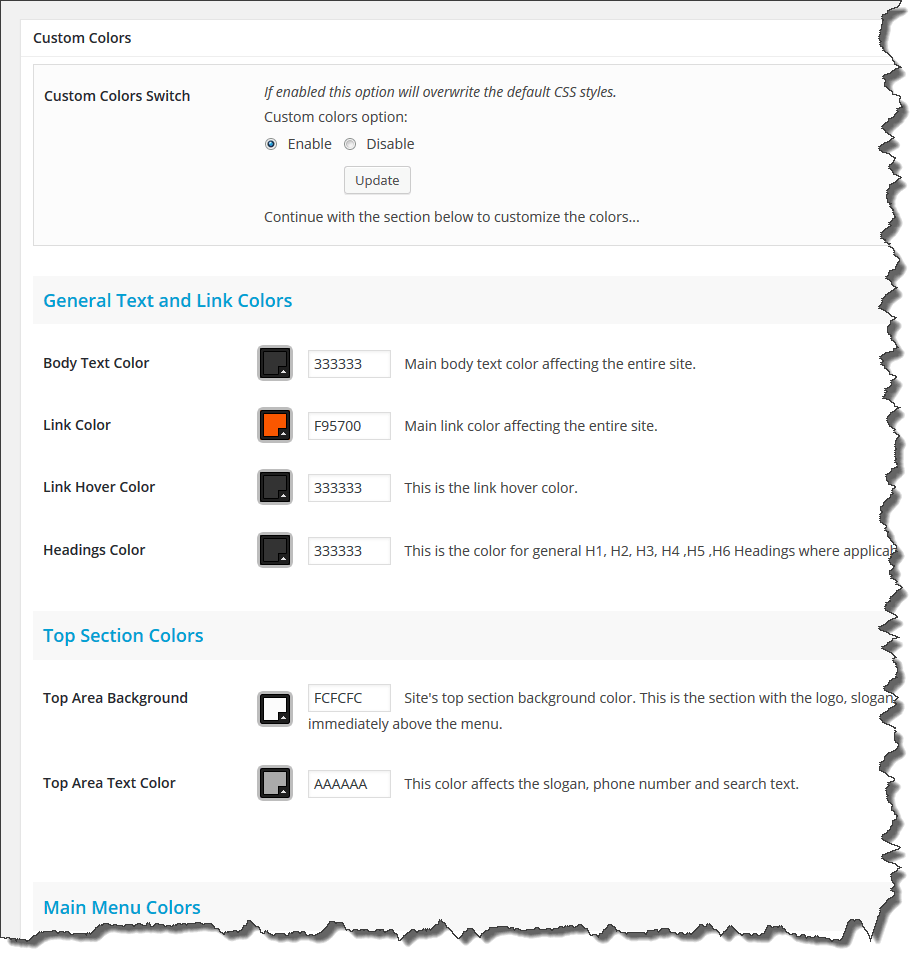
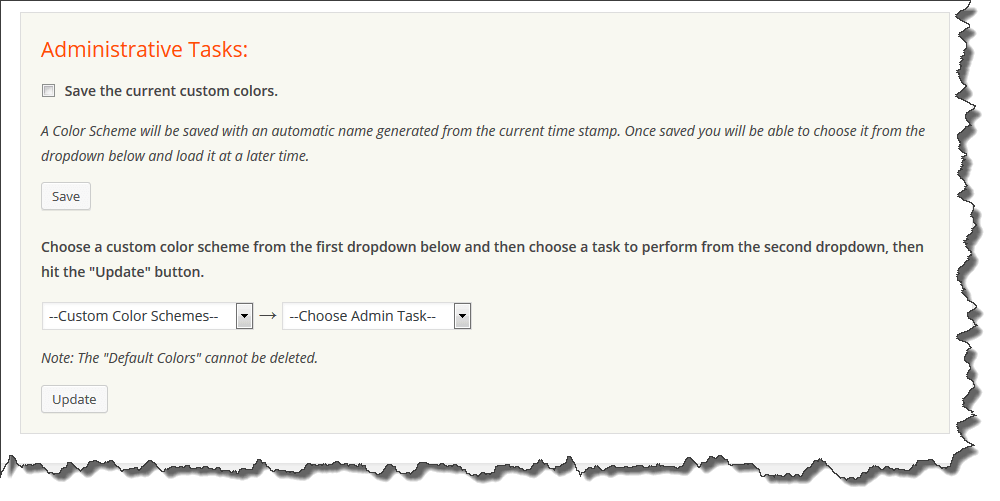
Another section packed with convenient features is the Custom Colors. Make sure to enable it first then save the page.
This section allows you to customize the look and feel of many of the theme's elements. For better ease of use those are grouped into sections. Some graphical elements such as lines and bullets are designed with some opacity so they stay visible regardless of the background.
You can also upload images as backgrounds on per section bases to replace solid background colour with images:
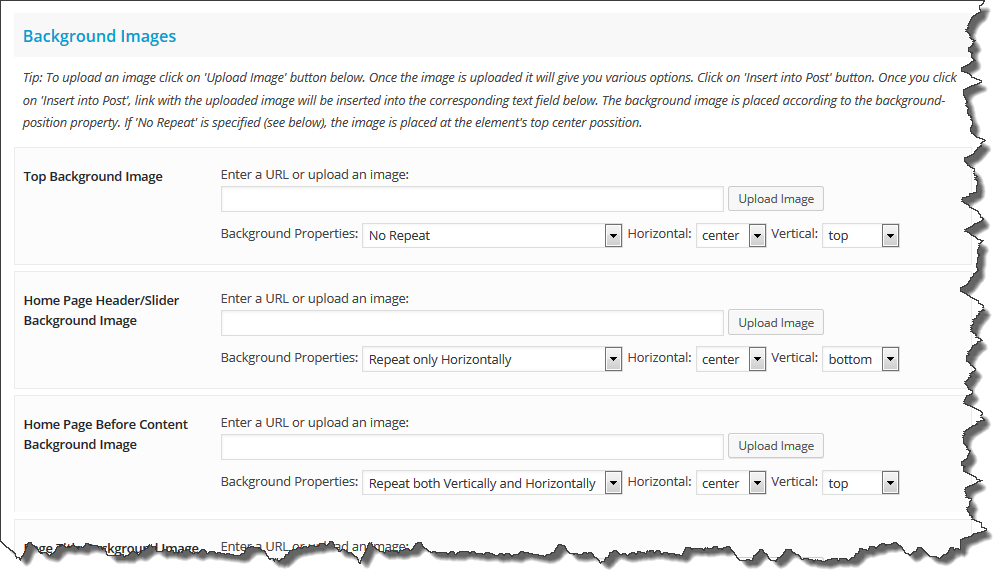
In addition, you will be able to save your custom color schemes (including any background images) that you create for future use, especially if you like to experiment with colors or like to change the look and feel of your site frequently..
O) List of All Custom Fields Available with the Theme - top
Portfolio related custom fields:- portfolio_item_thumb (this is the item's thumbnail image)
- portfolio_item_thumb_crop_align (this option can be used for the thumbnail image positional cropping or alignment of the cropping), possible values:
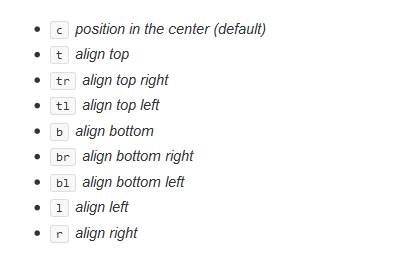
Note: To skip image cropping at any time add the query string parameternocropand processing will be ignored, returning the original URL. Example: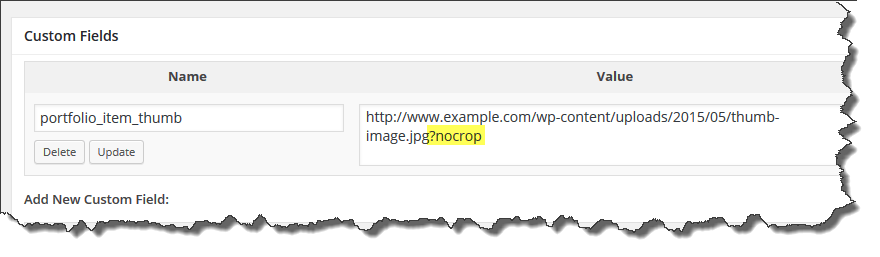
- portfolio_item_thumb_retina (use this option to enable automatic retina for the thumbnail image. A double pixel ratio will be used for the cropped image, example value: 'yes' without the quotes, or 'no')
- portfolio_item_preview (this is the item preview - it could be an image, video or a flash file)
- portfolio_item_description (this is the item description text)
- portfolio_item_preview_title (this is the item capture text shown underneath the preview item)
- portfolio_item_link (which allows to link directly from the thumbnail to another page or site rather than displaying a preview image)
- portfolio_item_link_target (use this custom field to open the link in a new window, for that set the value field to "_blank" without the quotes)
- portfolio_item_link_rel (use this custom field to specify a link relation attribute "rel" for Portfolio thumbnails, example value: "nofollow" without the quotes)
- portfolio_item_image_attachments (use this option to pull all the images attached to a single post to the Portfolio, example value: 'yes' without the quotes)
- portfolio_item_offset_image_attachments (use this to skip the number specified of image attachments, example value: '0' or '1' without the quotes)
- portfolio_filter_category - Sortable Portfolio Only (adds the ability to sort by "child" category, possible values: '0' or '1' without the quotes)
- portfolio_filter_sorting - Sortable Portfolio Only (adds the ability to sort by Alphabetical and Ascending/Descending order, possible values: '0' or '1' without the quotes)
- portfolio_filter_tags - Sortable Portfolio Only (adds the ability to sort by Tags used in the Portfolio posts, possible values: '0' or '1' without the quotes)
- post_image (an alternative to "Featured Image", this custom field can be used to specify the image to be used in posts when displayed in a Blog page)
- post_thumbnail (you may use this custom field to specify explicitly which image to be used for the thumbnail image)
- thumbnail (you may use this custom field to specify explicitly which image to be used for the thumbnail image)
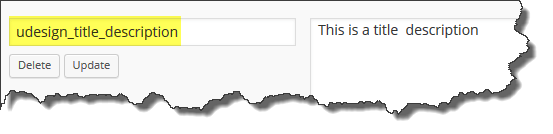
- udesign_title_description (this custom field can be used to add a title description next to a page or post title):
P) Responsive Layout - top
Responsive layout has been made an option for the "U-Design" theme since version 2.0.0. This feature, is optional and you may enable it under the theme's "Responsive Layout" section:
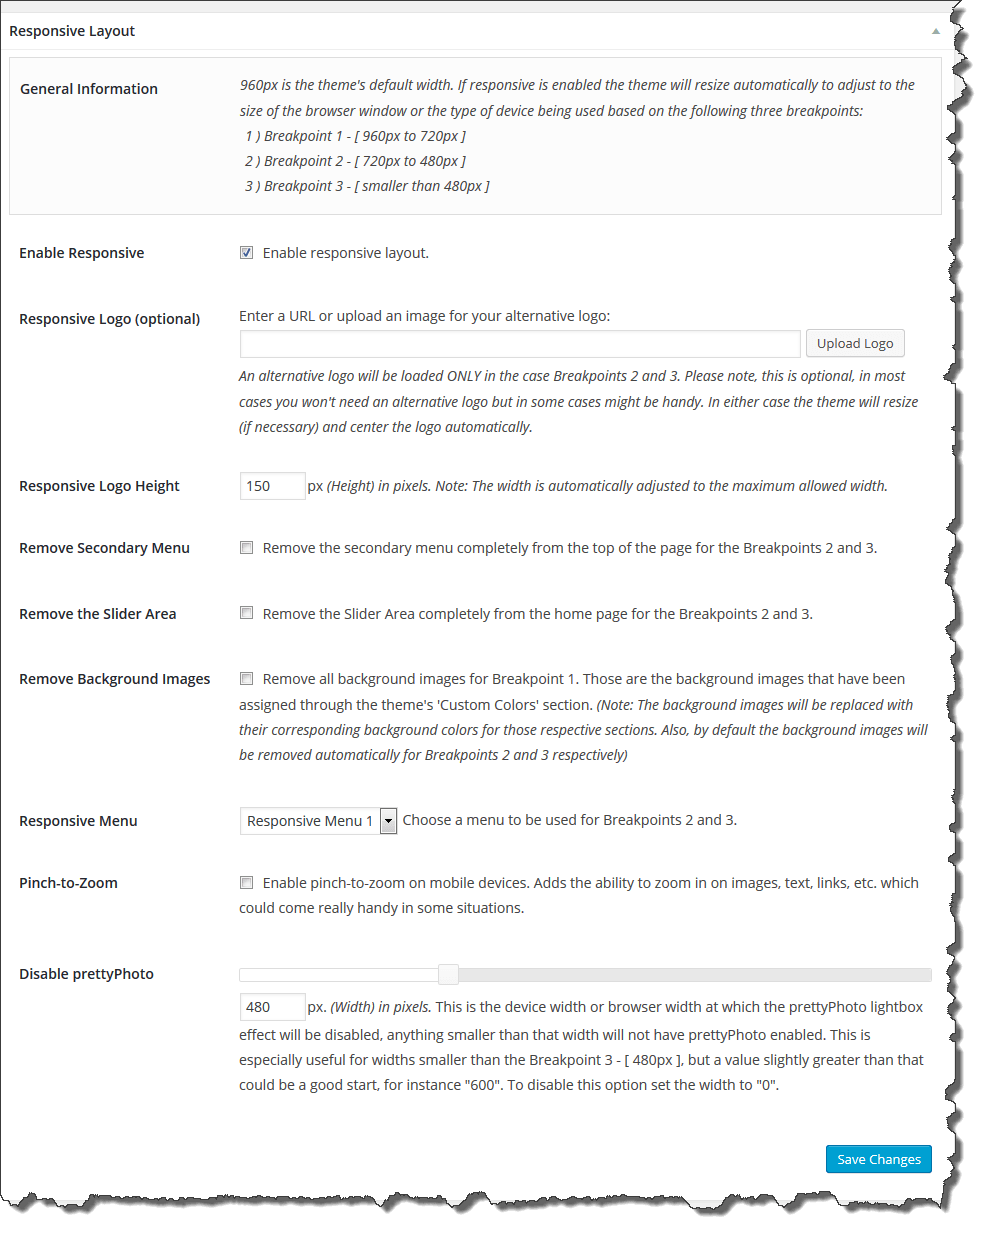
Most of the options that you will find under the theme's "Responsive Layout" section are pretty much self explanatory and I have tried to provide as much information as possible in the options themselves.
One thing I would like to mention is a CSS class that could be used with regular images in your content if you would like those images to be resized to 100% width for Breakpoints 2 and 3.
The class is called .responsive-max-width and it will work for regular images only and not the ones with image frames. Example usages:
<img class="responsive-max-width" src="http://image goes here.jpg" alt="Sample Image" />

Another important point is to pay attention to your own content, try to avoid defining fixed widths in pixels but rather use percentages where applicable. Which would be more inline with responsive layout and these elements will be able to resize automatically to adjust to the size of the browser window or the type of device being used. For additional information or if you would like to ask a question about responsive layout please refer to the theme's support forum. You may subscribe to the Support Forum HERE.
Q) WooCommerce Integration with U-Design - top
The Compatibility of the "U-Design" with "WooCommerce eCommerce WordPress plugin" is ensured through the "U-Design - WooCommerce Integration" plugin. The plugin is offered through the theme to install (Related Plugins), however you could also obtain a copy of it at any time as well as additional information from the theme's support forum HERE. If you haven't done that already, you may subscribe to the Support Forum HERE.
Please note that the version of the plugin in the support forum might be more up to date than the one shipped with the theme, this is because theme updates are not as frequent as this plugin's, So make sure to check with the forum for latest updates once in a while.
For sidebar location of the shop and single product page, that would be Sidebar 8 which you can set from the theme's "Layout Options" section.
R) Sources and Credits - top
I've used the following images, icons, fonts or other files as listed.
- jQuery JavaScript Library by John Resig
- Knob Buttons Toolbar icons by iTweek
- Quartz Icon Pack by Andy Gongea
- Fugue Icons by Yusuke Kamiyamane
- realistiK Reloaded by Pavel InFeRnODeMoN
- Cycle jQuery plugin by M. Alsup
- Color picker by Stefan Petre
- SWFObject by Geoff Stearns
- TableDnD plug-in for JQuery by Denis Howlett
- mr-image-resize script created by Ernesto Méndez and Matthew Ruddy
- Simple Breadcrumb by Christian "Kriesi" Budschedl
- CoolInput Plugin by Alex Weber and Evan Winslow
- Superfish menu by Joel Birch
- SelectNav.js select drop-down menu by Łukasz Fiszer
- jQuery meanMenu a responsive menu by Chris Wharton
- Respond min/max-width media query polyfill by Scott Jehl
- Search Excerpt by Scott Yang
- Masked Input plugin for jQuery by Josh Bush
- Get The Image WordPress plugin by Justin Tadlock
- MerlinWP by Rich Tabor
- jQuery validation plug-in by Jörn Zaefferer
- reCAPTCHA by Google
- Select2 by Igor Vaynberg
- Isotope jQuery plugin by David DeSandro / Metafizzy LLC
- Slider Revolution Responsive WordPress Plugin by themepunch
- WPBakery Page Builder for WordPress Plugin by wpbakery
- TGM Plugin Activation by Thomas Griffin and Gary Jones
Font Libraries used:
- Fontello by Contributors and Authors
- Font Awesome created by Dave Gandy
Thank you so much for choosing the "U-Design" theme and I hope you will enjoy using it!! :)
Andon